![]() 19c is a powerful database platform and installing it on a headless RHEL 8 server is a common requirement for many enterprise setups. This guide walks you through a clean, GUI-free installation using silent mode with a response file.
19c is a powerful database platform and installing it on a headless RHEL 8 server is a common requirement for many enterprise setups. This guide walks you through a clean, GUI-free installation using silent mode with a response file.
✅ Prerequisites
System Requirements
- OS: RHEL 8.10 (64-bit)
- RAM: Minimum 8 GB
- Swap: Equal to RAM if RAM < 16 GB
- Disk Space: Minimum 30 GB for Oracle binaries and data
🔽 Step 1: Download Oracle 19c
- Head to Oracle Downloads
- Download:
LINUX.X64_193000_db_home.zip
📦 Step 2: Install Dependencies
a. Install Required Packages
sudo yum install -y binutils gcc gcc-c++ glibc glibc-devel \
ksh libaio libaio-devel libX11 libXau libXi libXtst \
libXrender make sysstat smartmontools unixODBC \
compat-libcap1 compat-libstdc++ elfutils-libelf-devel libnsl
b. Enable CodeReady Builder Repo
sudo subscription-manager repos --enable codeready-builder-for-rhel-8-x86_64-rpms
c. Use Oracle Preinstall RPM
sudo yum install oracle-database-preinstall-19c
If unavailable:
wget https://yum.oracle.com/.../oracle-database-preinstall-19c-1.0-1.el8.x86_64.rpm
sudo rpm -ivh oracle-database-preinstall-19c-1.0-1.el8.x86_64.rpm
This creates:
- User:
oracle - Groups:
oinstall,dba - Adds user “oracle” into the groups created above.
📁 Step 3: Create Required Directories
sudo mkdir -p /u01/app/oracle
sudo mkdir -p /u01/app/oraInventory
sudo chown -R oracle:oinstall /u01
sudo chmod -R 775 /u01
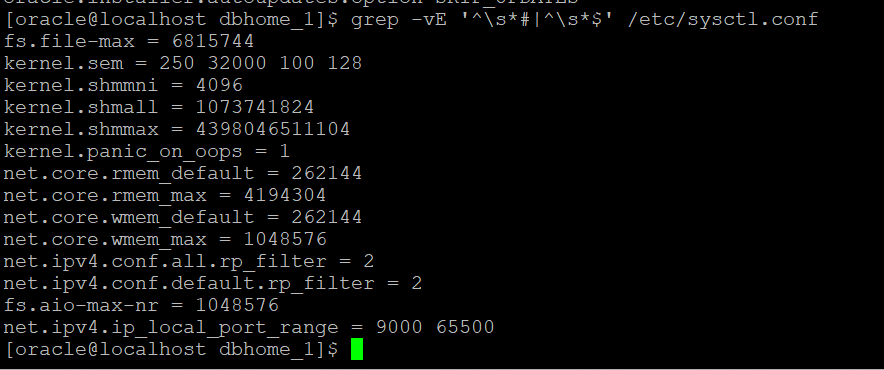
🧠 Step 4: Configure System Parameters
Kernel Parameters – /etc/sysctl.conf
fs.file-max = 6815744
kernel.sem = 250 32000 100 128
kernel.shmall = 2097152
kernel.shmmax = 8589934592
kernel.panic_on_oops = 1
net.core.rmem_default = 262144
net.core.rmem_max = 4194304
net.core.wmem_default = 262144
net.core.wmem_max = 1048576
fs.aio-max-nr = 1048576
net.ipv4.ip_local_port_range = 9000 65500
Apply changes:
sudo sysctl -p
User Limits – /etc/security/limits.conf
oracle soft nproc 2047
oracle hard nproc 16384
oracle soft nofile 1024
oracle hard nofile 65536
oracle soft stack 10240

🌐 Step 5: Set Oracle Environment Variables
Edit /home/oracle/.bash_profile:
export ORACLE_BASE=/u01/app/oracle
export ORACLE_HOME=$ORACLE_BASE/product/19.0.0/dbhome_1
export ORACLE_SID=ORCL
export PATH=$ORACLE_HOME/bin:$PATH
export LD_LIBRARY_PATH=$ORACLE_HOME/lib

🧵 Step 6: Install Oracle Binaries (Silent Mode)
a. Switch to Oracle User
su - oracle
b. Unpack Oracle ZIP
unzip /tmp/LINUX.X64_193000_db_home.zip -d $ORACLE_HOME
cd $ORACLE_HOME
c. Prepare Response File-
cp $ORACLE_HOME/install/response/db_install.rsp $ORACLE_HOME/install.rsp
vi $ORACLE_HOME/install.rsp

cd $ORACLE_HOME
./runInstaller -silent -responseFile $ORACLE_HOME/install.rsp -ignorePrereqFailure
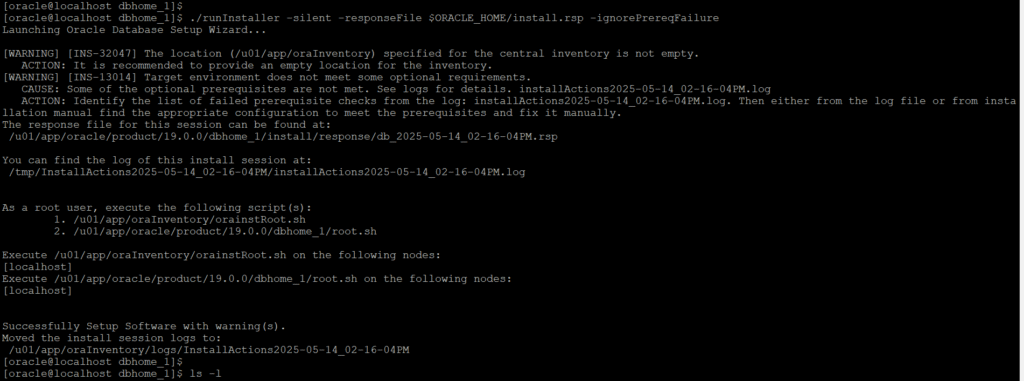
If the installation is successful, you should see "Successfully setup software".
**Warnings can be ignored.
Installation logs are saved at:
/u01/app/oraInventory/logs/InstallActionsyyy-mm-dd_hh-mm-ssAM/PM
After completion, as root, run the following two cmds:
- sudo /u01/app/oraInventory/orainstRoot.sh
Purpose:
Initializes the Oracle Inventory directory and sets the proper permissions.
What it does:
-Creates /etc/oraInst.loc (tracks Oracle installations)
-Sets ownership and permissions for the Oracle inventory directory (/u01/app/oraInventory)
-Required for managing future Oracle installations or patches
2. sudo /u01/app/oracle/product/19.0.0/dbhome_1/root.sh
Purpose:
Configures the Oracle Home directory and sets up necessary system components.
What it does:
-Sets permissions and ownership on Oracle binaries
-Creates or updates the oratab file (used to auto-start DB on boot)
-Configures system files like oratab, symbolic links, and environment settings
-May run additional OS-level setup for services

Once this is done, you’ll have Oracle software installed. Then you can create the database using dbca in silent mode.
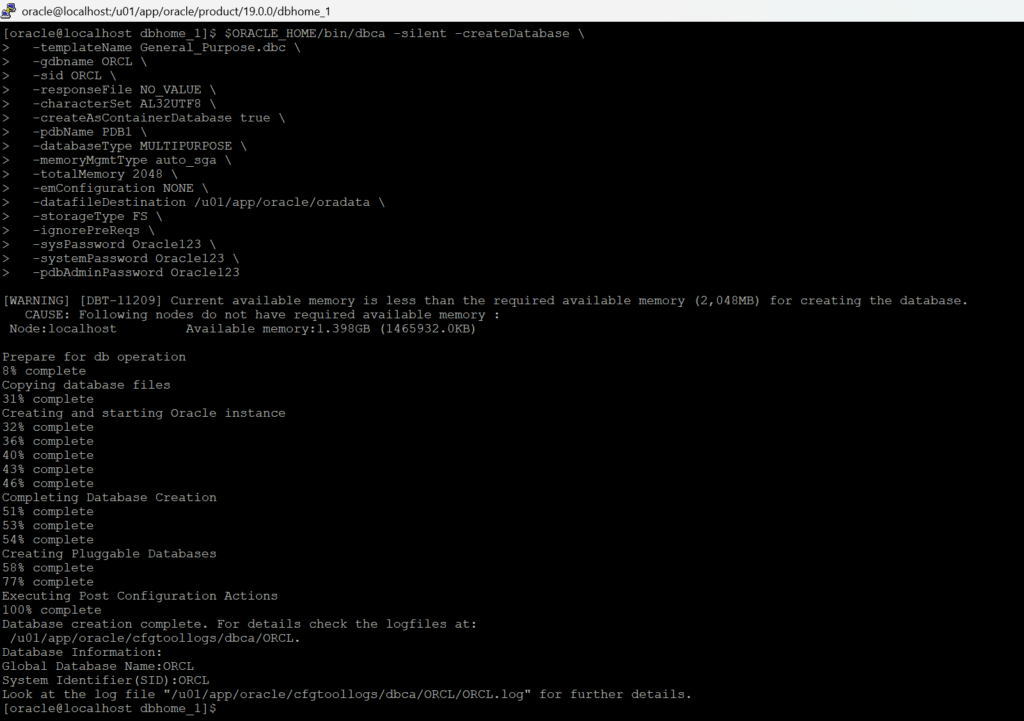
🧱 Step 7: Create an oracle Database (Silent Mode)
Here’s an example for a CDB with one PDB:
$ORACLE_HOME/bin/dbca -silent -createDatabase \
  -templateName General_Purpose.dbc \
  -gdbname ORCL \
  -sid ORCL \
  -responseFile NO_VALUE \
  -characterSet AL32UTF8 \
  -createAsContainerDatabase true \
  -pdbName PDB1 \
  -databaseType MULTIPURPOSE \
  -memoryMgmtType auto_sga \
  -totalMemory 2048 \
  -emConfiguration NONE \
  -datafileDestination /u01/app/oracle/oradata \
  -storageType FILE_SYSTEM_STORAGE \
  -ignorePreReqs \
  -sysPassword Oracle123 \
  -systemPassword Oracle123 \
  -pdbAdminPassword Oracle123


Key Parameters:
• -sid: Your Oracle SID
• -gdbname: Global DB name
• -createAsContainerDatabase true: Creates a multitenant (CDB)
• -pdbName: Pluggable DB name
• -datafileDestination: Where to store datafiles
• -totalMemory: Memory in MB
• -sysPassword, -systemPassword, -pdbAdminPassword: Set passwords
🧪 Final Test
Check if everything is working by executing the following cmds:
1. lsnrctl status -> used in Oracle Database environments to check the status of the Oracle Listener, which handles incoming client connection requests. We dont have a listener configured, so in our sample tutorial setup we encountered error "Connection refused". 2. sqlplus / as sysdba ->used to log in to Oracle SQL*Plus as the SYS user with SYSDBA privileges without entering a username or password. This is known as Operating System Authentication. Requirements for This to Work: -You're running this command from the Oracle server host. -The OS user you're logged in as is in the Oracle DBA group (dba on Linux or ORA_DBA on Windows). -Oracle environment variables (e.g., ORACLE_HOME, ORACLE_SID) are correctly set. 🔐 What It Does: Logs in to the local Oracle instance using the SYS user in SYSDBA mode.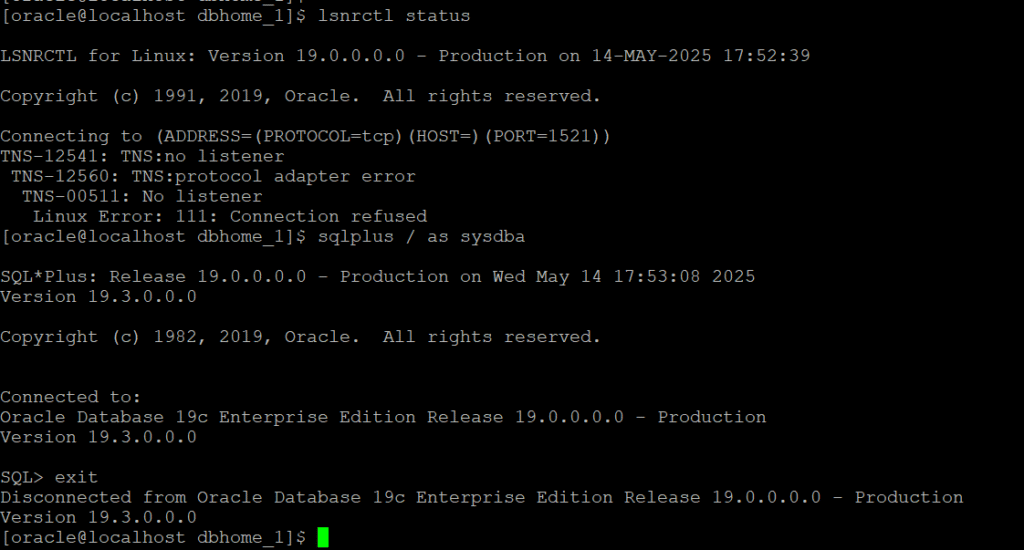
🎉 Done!
You now have Oracle 19c installed and configured on a headless RHEL 8 server, without a GUI. This setup is perfect for production or development servers where a lightweight footprint is essential.
Leave a Reply